*When your home has an EWP rim board that you will be
attaching the deck ledger to, different spacing other than the engineering
stamped onsite spacing charts can be achieved for the BR Brick Bracket
spacing. The onsite EWP engineer stamped bracket spacing charts are
engineer spaced for an EWP rim board, with a manufacturer rating of
an allowable load of 300lbs/350lbs per bracket/bolt. You may be using
an EWP rim board that has a manufacturer rating of a higher allowable
load than 350lbs per bracket/bolt. For example, some EWP manufactures
have an allowable load of 400-650lbs per bracket/bolt. Using the NTA
Inc. testing report, along with your specific EWP manufacturer's allowable
loading numbers, your professional engineer can develop an engineer
stamped spacing chart, specific to the manufacturer of the EWP rim board
your home has installed that you will be attaching the deck ledger to.
A few notes before installation:
Water intrusion that gets to the homes Rim/Band
Joists will cause rot, deck ledger failure and deck collapse.
Installer is responsible for preventing water intrusion
Thru-Bolts must be Hot-Dipped Galvanized or Stainless
Steel.
Read Installation Instructions Completely Before
Installing.
Install Fasteners ONLY in Provided Holes.
If you are using 1-1/8" EWP Rim Board, it must
be rated for at least an allowable load of 350lbs., if using 1"
an allowable load of 300lbs. per ½" through bolts. (LAG
BOLTS NOT ALLOWED).
Installation Instructions
1. Find the crown on your deck ledger board, then mark
or chalk line across the entire top/crown of the deck ledger from
end to end, (a bolt jig location line). For a 2"x 8" deck
ledger, locate the line 3/8" down from the top. For a 2"x
10" deck ledger, locate the line ½" down from the
top.
2. Use your Local Jurisdiction & EWP Manufactures minimum bottom
and end clearances for the ½" through-bolts.
3. Locate what will be the permanent deck ledger location and temporarily
fasten the deck ledger at that location.
4. Using the Engineered BR Brick Bracket Spacing Table,
(included with these instructions), locate the bolt spacing on the
face of the deck ledger. The ½" through-bolts shall be
staggered from the top to the bottom along the horizontal run of the
deck ledger. The Bracket will flip up and down creating a uniform
top and bottom stagger pattern.
5. Make a "Bolt Hole Location Jig" the same size of the
Bracket nose that the back of the deck ledger will fasten to with
a small hole large enough for a pencil lead to go through, (see website
for jig example).This small hole will allow you to mark your drill
through holes for the ½" bolts onto the deck ledger. (Other
jigs may be made).
6. Using the "Bolt Jig Locator Line" you
made on your deck ledger, take your "Bolt Hole Locator Jig"
and place it to the "Bolt Jig Locator Line" that is on the
face of the deck ledger at your drill through-hole locations, and
then mark your drill through locations through your "Bolt Hole
Location Jig".
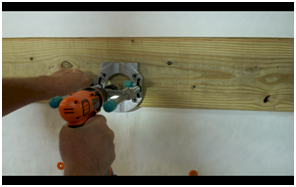
7. THIS STEP IS CRUCIAL FOR AN EASY INSTALLATION!! Get a good portable
drill guide, (we use guides purchased from Rockler Stores), and a
9/16" drill bit for your through deck ledger and through homes
rim board holes to be drilled. Go to your jig marked holes and drill
all bolt locations. Now remove temporarily fastened deck ledger.
8. If the subsiding is anything other than structural
panel sheathing, for example, foam, gypsum or similar, the subsiding
must be removed at the Bracket locations due to crushing of the subsiding
that is a result from the weight/load of the deck. If structural panel
sheathing is the homes subsiding, (Plywood, etc…), you can opt
to skip this step. Take a Bracket as a template, a ½"
through bolt and temporarily place the Bracket and through bolt at
your drilled through locations. Trace the outline of the Bracket at
your drilled through locations, remove Bracket and cut out subsiding.
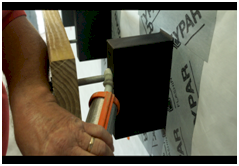
9. Now take your Brackets and place at your cut out locations and
fasten with at least 4 - 10D shank size nails at the top 4 locations.
The tip of the 10D shank nail shall fully extend at least ¼"
beyond the inside face of the home's rim board. If you only use 4
of the 6 nail holes, fill the other 2 holes with sealant and use sealant
over the 4 installed nails to prevent water intrusion.
10. Now place your deck ledger to the Bracket and insert the ½"
through bolts with washers at the head and nut leaving the bolts loose
on the nose of the Bracket. On the nose of the Bracket, at the ½"
through hole, is a conical shape designed to apply a sealant to stop
water intrusion. Apply your sealant and then tighten the ½"
through bolts.
11. Go to www.brbrickbracket.com for an additional
product, the "Bolt Keeper", with video of how this accessory
can be used, along with an entire Installation Instructional Video
for the BR Brick Bracket.